DIY Adjustable Workout Bench + Storage
23 Aug 2020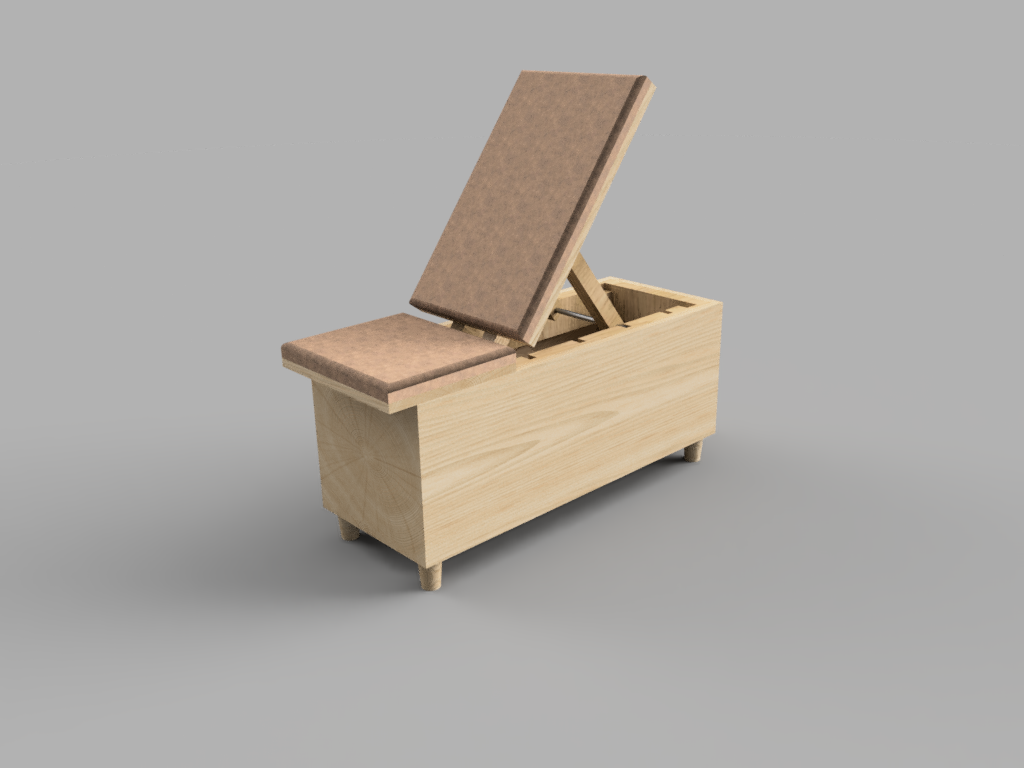
Project Difficulty
- 8/10 (Not for the faint of heart)
After COVID struck and gyms shut down it became pretty clear that I’d need something better than my flimsy piano bench to use as a workout bench. There was an influx of DIY versions of home workout equipment being advertised on instagram and youtube but nothing quite met all my requirements. This design represents a lot of thinking and planning and takes inspiration from some of the best other DIY designs I could find online. I’ve posted some of my favorite other benches below.
Project Requirements
As usual, I started with a list of project requirements and constraints.
- Sturdy, functional workout bench that can support my weight
- Has an adjustable back for incline and seated exercises
- Stores fitness equipment easily out of view
- Mobile enough for moving in and out of the way
- Looks nice sitting out
Supplies
- 3/4” Plywood (I used Baltic Birch)
- Standard 2x4s
- Standard 2x2s
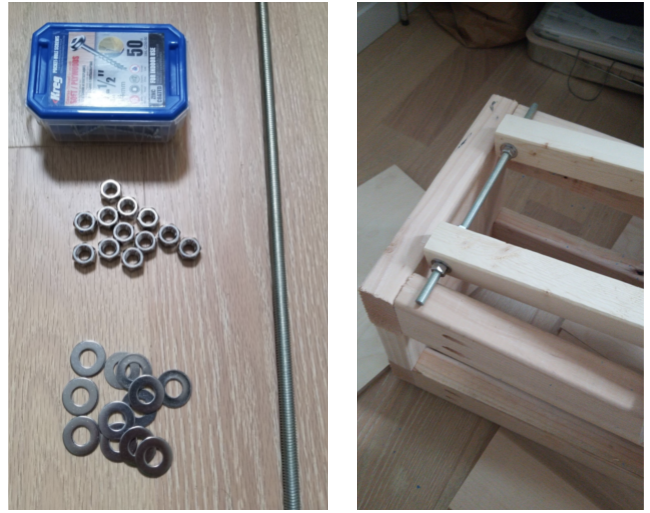
- #8 Threaded Rod
- #8 washers and nuts
- Various Wood Screws
- Heavy Duty Furniture Casters
- 1/4” Thick Board for cushions
- 1” Foam Badding
- 2 yards of heavy-duty vinyl / faux leather
- Water-Based Polyurethane (or whatever finish you want)
Required Equipment
- Circular Saw / Table Saw
- Track Saw Guide
- Pocket Screw Jig
- Jigsaw
- Drill
- Hack Saw
- Sandpaper
- Measuring Tape
- Level
- File
- Heavy Duty Stapler
- Various Clamps
Cutlist
Main Structure
- Four (4) 31.5” 2x4s (A)
- Four (4) 12.5” 2x4s (B)
- Four (4) 5.5” 2x4s (C)
- Two (2) 12.5” x 14” 3/4” Baltic Birch (D)
- Two (2) 12.5” x 34.5” 3/4” Baltic Birch (E)
- One (1) 14” x 36” 3/4” Baltic Birch (F)
Adjustable Assembly
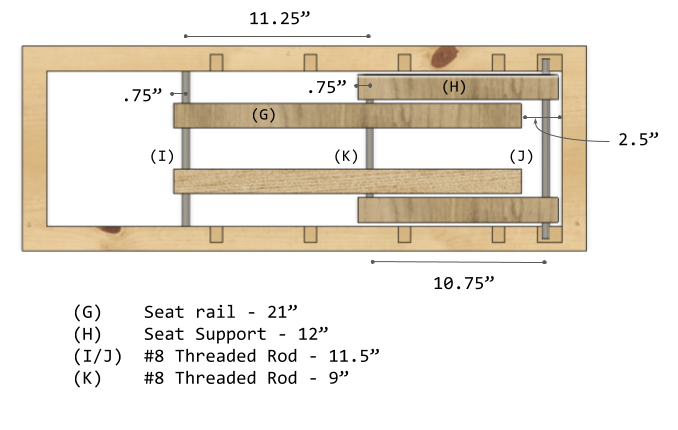
- Two (2) 21” 2x2 (G)
- Two (2) 12” 2x2 (H)
- Two (2) 11.5” #8 Threaded Steel Rod (I/J)
- One (1) 9” #8 Threaded Steel Rod (K)
Seat
- One (1) 14” x 23” 3/4” Baltic Birch (L)
- One (1) 14” x 12” 3/4” Baltic Birch (M)
- Two (2) 1.5” x 4” 3/4” Baltic Birch (N)
- One (1) 1.5” x 6” 3/4” Baltic Birch (O)
Design
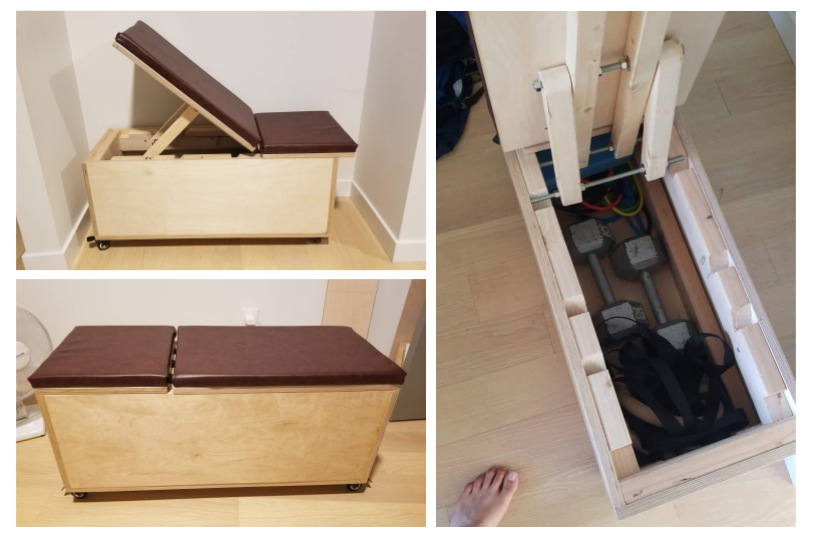
The thing that I found lacking with the other DIY home workout benches is that they either had storage or were adjustable. None of them did both. This bench could much more easily be made as just a flat bench with storage. The final dimensions of this bench is supposed to be 3ft long by 14” wide and roughly 18” high (with the cushion). The bench is designed with casters (not shown) so it can easily be rolled in and out of the way.

Steps
-
First step is to build the inner frame that will provide the structure to the bench. Cut pieces A, B and C to their proper lengths, as specified in the cutlist above.
-
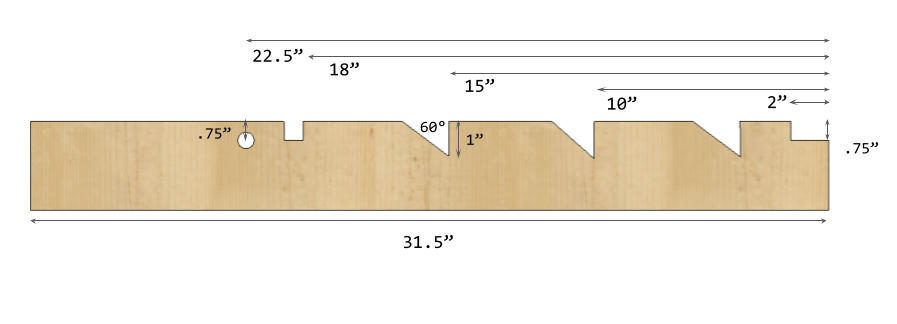
Next take two of the (A) pieces. These will have additional details added to it to make the adjustment assembly work. Use a 3/8” drill bit to drill the holes through both A pieces. Then use a jigsaw to cut out the notches and triangles as shown below. These are up to you where they go. They determine what angles are available for the seat to adjust to. Make sure that for the second adjustment piece you do is the mirror image of what’s shown here.
-
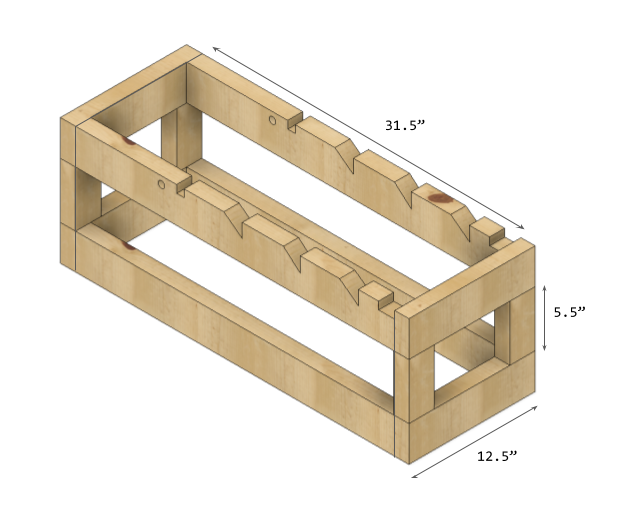
Now assemble the frame 2x4s as shown below. I used pocket screws to put everything together, but normal wood screws through the faces would work here as well. The frame won’t be visible from the outside so it doesn’t need to be nice wood. You will use pieces A, B and C for this step.
-
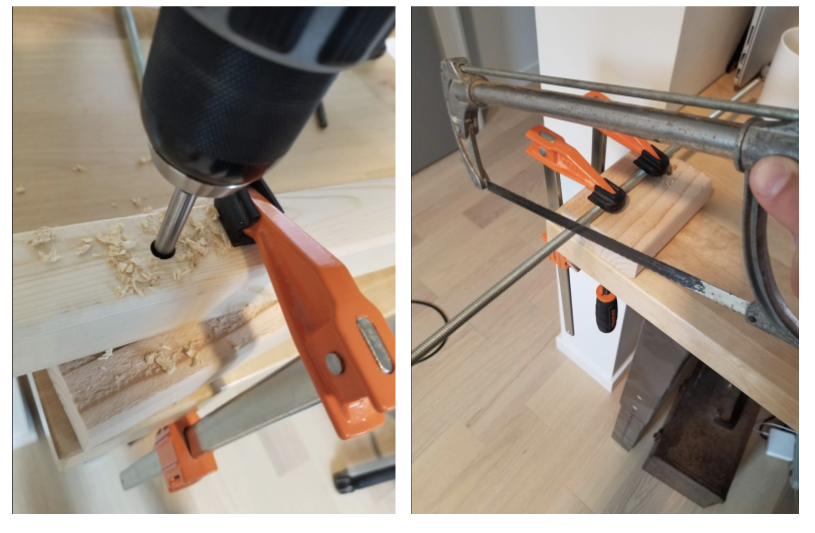
We’ll build the seat adjustment assembly next. Drill holes large enough for the #8 threaded rod to go through .75” in from the end of both G pieces and both ends of the H pieces. Make sure this hole goes through exactly perpendicular to all the the 2x2 faces. If you have a drill press, that would be the best.
-
Cut the threaded rod using a hacksaw into 3 pieces, I, J and K. You’ll likely want to file the edges down to remove any steel burrs.
-
Next drill the same diameter hole 11.25” up from the center of the first hole on both the G pieces. This will act as the fulcrum point for the support arm pieces (H) to attach.
-
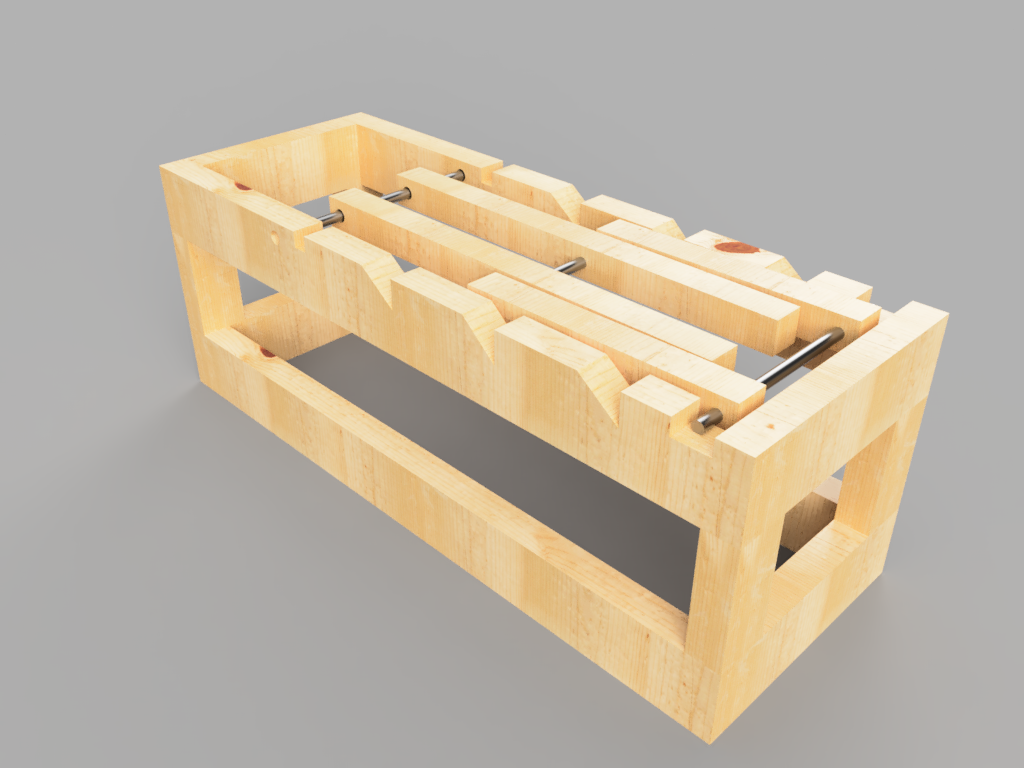
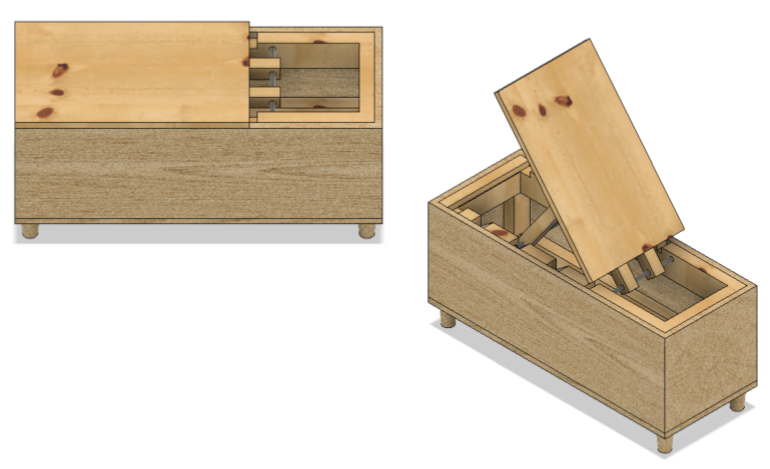
Assemble the adjustment assembly with the 2x4 frame carefully using washers and nuts on either side of every place where the 2x2s meet threaded rod. The threaded nuts will help keep the 2x2s all in alignment and allow everything to rotate freely. The final assembly should look similar to the rendering below.
-
Now that the inner workings are all built we’ll move on to cladding the frame with the outer walls. Cut and attach the outer walls (Pieces D, E and F) using a combination of pocket screws in the corners and screws between the baltic birch and the inner frame. Make sure to hide the pocket screws in the interior.

-
Attach some heavy duty casters to the bottom of the base. In the renderings I’m showing feet but I’d always planned to use locking casters. Make sure to take into account the height of the casters for the final height. The ones for this design were 2.5” inches tall and the entire design takes that into consideration to reach the final height of 18”.
-
Cut the seat back (L) to size and attach this to the seat rails (G) using long wood screws. Make sure to align the top of the seat back with the outer edge of the bench walls so they are coincident. It took some finagling with clamps to get everything lined up before driving in the screws.
-
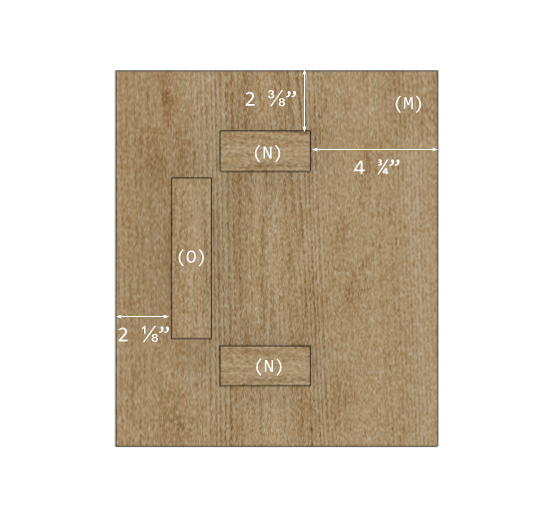
For the seat portion to work properly it has to be able to slide back and forth, allowing the adustable back of the seat to move freely. I also wanted the seat to be easily removable. This was solved by attach 3 small pieces of wood (N/O) to the bottom of the seat (M). The pieces serve as guide rails for the sliding and a stopper so the seat doesn’t slide too far out of back.
-
Now that all the wood components are built it’s time to sand it all down. You’ll likely want to sand down any sharp corners especially well to reduce the chance of injuring yourself when you’re actually using the bench for working out.
-
Apply a finish everywhere that’s visible. Let it dry, sand once again and apply more finish. Do this until you’re satisfied with the level of finish.
-
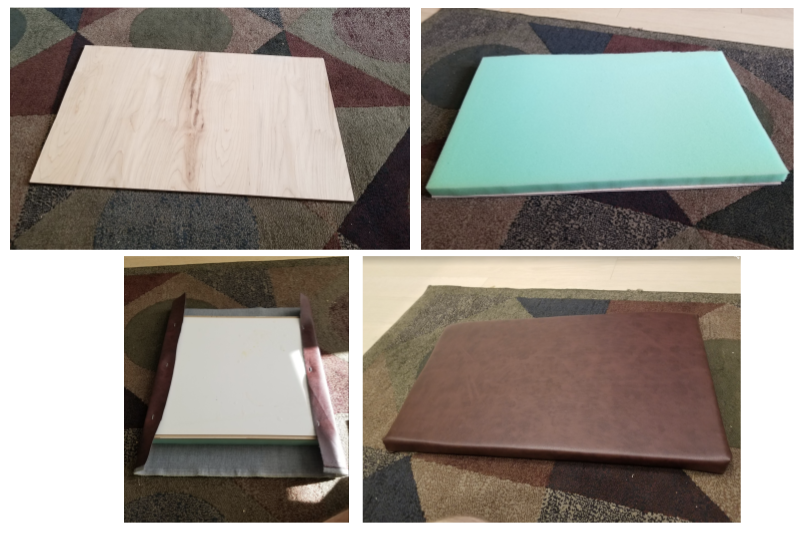
We’re almost at the end. It’s time to make the cushions. To do this, take the thin 1/4” boards which should be cut to the dimensions of the seat top and the seat back. Cut the 1” foam badding to same dimensions. You’re going to want to glue the foam badding down to the board somehow. I used wood glue, which worked ok but anyway you attach them should work.
-
Cut your upholstery material about 3 to 4 inches larger than the back and seat boards in every direction. Lay the material face down, then lay the boards and foam padding on top so that the boards are facing out. Pulling as taut as you can, staple the material into the boards. Think of wrapping a present when you do this so you can get nice corners. I used LOTS of staples.
-
Finally, attach the cushions to the seat bottom and seat back using some short wood screws through the back of the boards. In this way the cushions should be firmly attached but the screws won’t be visible.
There you have it
I know this was a hard one but I’m really happy with how it came out. It checks all my boxes and I think it looks great. If anyone out there has or is looking to do something like this I’d love to know. If you think I’m a bit crazy or could have accomplished this without all this work please let me know.